Showing posts with label O365. Show all posts

Tuesday, 29 September 2015

How to Add Dynamics NAV Tile to the O365 App Launcher


We can add our own tiles to O365 app launcher with Admin rights.

Browse to Admin dashboard by clicking on Admin tile on app launcher.


Choose the ‘Company Profile’ on left menu.


Select ‘Custom Tiles’ from the left menu.


The ‘Custom Tiles’ page looks like below.

Click on ‘Plus’ sign to create a new tile.


We need to also provide the logo for the Tile.

So we need to upload the logo first. We can upload to One Drive and select the full path name and paste in tile Info.


We can also change/remove the tile later on same Custom Tiles page.


Now go to My Apps page on App Launcher.


You can find newly created tile here.


Now click on pin it the App Launcher.


Now we can see the new tile in the App Launcher.


When you click on the NAV Tile then it will directly open the Web client.

Thursday, 30 April 2015

OFFICE 365 INTEGRATION IN NAV 2015 – Excel/SharePoint


If you have signed up for Office 365, Microsoft Dynamics NAV can use this service to open and save documents. For example, when you export a report to Excel and save it on Office 365, Microsoft Dynamics NAV can use Excel Online that your Office 365 account uses to open the document.

Before you can use Office 365 and SharePoint Online with Microsoft Dynamics NAV, you must configure the service in Microsoft Dynamics NAV.

If you want to use the same folder to store temporary files for all users, you must specify a shared user account. Otherwise, each user's temporary files are stored in their personal document repository on the SharePoint site.


  1.  Open “Online Document Storage Configuration” from below path                                                                                                                                                      
  2. Fill the Location to your SharePoint site: Specifies the unified resource indicator (URI) for your site on SharePoint Online, such as https://Cronus.sharepoint.com                                                                                
  3. Fill the Folder field which specifies the folder in the document repository for this document service that you want documents to be stored in.                                      
  4. This field is required. If you have not already created a subfolder in your document repository, you must create one now, and then specify it in the Folder field.                                                                                                                            
  5. The Document Repository field includes the top-level folder in the document repository that your document service provides. The Folder field specifies a subfolder so that you can keep business documents and drafts separate from pictures and other shared documents. For example, if the Document Repository field is set to Documents, the Folder field can be set to Business Documents.                                                                                                                                         
  6. When a user exports data to Excel, for example, Microsoft Dynamics NAV saves the temporary file at the location that is specified in the Document Repository and Folder fields, such as https://Cronus.sharepoint.com/Documents/Business Documents.                                                                                                                
  7. Fill Document Repository field: Specifies the name of the document library, such as Documents.                                                                                                   
  8. Fill User Name field: Specifies the account that Microsoft Dynamics NAV Server must use to log on to the document service.                                              We recommend that you specify a different user name than the administrative account. This helps reduce the risk of users accessing administrative settings, for example. For example, if your user name as an administrator is CronusAdministrator@Cronus.onmicrosoft.com, then the user name for Microsoft Dynamics NAV Server can be nav@Cronus.onmicrosoft.com or any of the regular user names that you have created.                                                            
  9. On the Actions tab, in the General group, choose Set Password.                           In the window that appears, specify and confirm the password for the account    that you specified in the User Name field. Choose the OK button.                  When you have set up the service, you can test whether that configuration is valid.                                                                                                                           
  10. On the Actions tab, in the General group, choose Test Connection.                       A message displays the result of the test.                                                                    


UPDATE/NOTE;
In latest version of NAV navigate to CRONUS International Ltd./Departments/Administration/IT Administration/Services

And select Sharepoint Connection Setup to add above setup.


Friday, 9 January 2015

OFFICE 365 INTEGRATION IN NAV 2015 - Exchange Online

NEW SMTP EMAIL FLOW IN NAV.


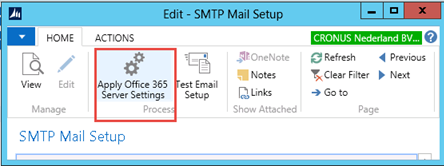
  1. Open SMTP Mail Setup Page
  2. Click on action Apply Office 365 Server Settings.
  3. The fields SMTP Server, SMTP Server Port and Authentication fields will be filled up automatically
  4. Fill the User ID and Password fields based on the existing account in Office 365.
  5. Click "Test Email Setup" action
  6. If everything is configured properly in Office 365 and NAV 2015 then you will get below successful message.
  7. And below mail will be sent to Office 365 account.
  8. After this step if we try to run action Email Confirmation from Sales Order then a dialog box will be opened showing from address as office 365 account.
  9. Press OK button to send an email to required address.
    Below screen shot shows that mail is sent from Office 365 account