Showing posts with label New Development Environment. Show all posts

Thursday, 16 February 2017

NAV Development Tools Preview – February Update

Welcome to the February update for the Developer Preview. As in the last two updates, MS has fixed bugs reported by us on GitHub issues list (https://github.com/Microsoft/AL/issues) and made other improvements. 
We can see a list of what’s new below.
– Finishing your design work in the client now offers two options on saving, allowing you to save the changes to the tenant for all users, or to save the changes to a file that you can work on later in VS Code. Performance of the designer has improved and is snappier.


– To guide users towards a better page design, we’ve been adding a few rules in the in-client designer. For example, you can only drop media fields onto card part pages. Also, you cannot drop a field under a repeater control, because this is not the design that list pages were intended for.
– Getting started in VS Code has been streamlined. Once you’ve installed the visx file, just enter AL: Go! in the command palette (Ctrl+Shift+P) and you’ll be offered a new folder to build a solution in. The preset values are configured for your Azure Gallery instance and if you’re missing the symbols for the project, VS Code will offer to download them for you. Note, we’ve introduced a shortcut for this too – Alt+A, Alt+L. Enjoy!


– We’ve made improvements in IntelliSense with contextual support for keywords in all objects – and we’ve added autocompletion and IntelliSense for setting values for the CalcFormula and TableRelation properties.
– You can now reference Query objects from the base application. This gives you the ability to declare variables of the type Query and call AL functions on them.
– References by symbols have been implemented meaning that you can find all references in an inline editor. Pressing Shift+F12 on top of a symbol will open a view that lets you jump to all instances of that symbol. Furthermore, selecting a symbol and pressing F2 allows you to rename all instances of that symbol. Note, that symbolic rename is cleverer than text matching and will only change the current symbol. For example, it will replace all instances of variable Foo, but not rename function Foo.
– Two AL variables have been introduced mapping to the HTTP Client and JSON types. Using HttpClient, HttpResponseMessage, JsonObject, JsonToken, and JsonValue will allow you to access Azure functions and other Web services.
– Miscellaneous bugs reported from GitHub have been fixed.
Just like in the last update, we’ve already updated the Azure Gallery so new images will include the update. Again, we’ve designed for compatibility with your existing files so any .al projects you have already will work with the AL Language extension for VS Code. Having said that, changes may need to be introduced at some time so save your work independently as you go.
MS has big ambitions for the next month so stay with us. Thanks again for the bugs – keep them coming and MS will fix them as fast as they can.

Tuesday, 24 January 2017

How to Modify existing field and action properties on a page using Visual Studio Code


I would like to show How to Modify existing field and action properties on a page using simple assignment.

My goal is to make below changes in standard Purchase Order page.

1.     I would like to change existing field name from “Buy-from Vendor No.” to “Vendor No.”

2.     And to make sure that Post action is visible only from Windows Client and not from Web Client.

Purchase Order page looks like below before modifications.

I have created PurchOrderPageExtension.al object as shown in below screenshot.

You can refer my previous blogs to know how to create al objects in detailed.


1st part of the code shows how to modify existing field “Buy-from Vendor No.”

Here I have modified property CaptionML of “Buy-from Vendor No.” field.

2nd part of the code shows how to modify existing action Post properties.

Here I have modified properties CaptionML and Visible.


You can check below part for declaration of global variables and OnOpenPage triggers.

[InDataSet]

PostVisible : Boolean;

Above declaration is equal to Setting IncludeInDataset property of global variables to Yes in previous development.

Now Build Package (Ctrl+Shift+B) and Publish (F5).

Now the Purchase Order page looks like


We can notice that field “Buy-from Vendor No.” changed to “Vendor No.”

Post is changed to “Post visible from Windows Client”.

And Post button is not visible from Web Client.
Make sure that we can modify only few properties as described here
https://msdn.microsoft.com/en-us/dynamics-nav/extension-packages-capability-support-matrix

Friday, 20 January 2017

Adding Logo, privacyStatement and help url's to Extensions using Visual Studio Code


If we would like to add Logo, privacyStatement, help, url and End user License agreement (EULA) links to our extension then we need to fill below settings in app.json file
Place the logo in your extension folder and add it to logo settings.

I have added sample links in all privacyStatement, help, url and End user License agreement (EULA) setup.

You can add proper links as per your scenario.

Now Build (Ctrl+Shift+B) the package and Publish (F5).

Go to Extensions page and notice logo for our extension.

Open extension card and click on any privacyStatement, help, url and End user License agreement (EULA) links which opens links we provided in above setup.

We can also enter description of our extension in above setup which is shown in Extension Card.

If we don’t set these setup’s in app.json then no links will be opened when we click in extension card and default image is added to extension like

Monday, 16 January 2017

NAV Development Tools Preview – January Update

Microsoft announced an update to the developer tools preview.

The update will be applied automatically to the Azure Gallery and any new images taken will automatically include the updated version. Code written from the December update is expected to work, however, please note that between versions code needs to be moved to the new VM and extensions must be recompiled and redeployed which will result in a data loss. Use http://aka.ms/navdeveloperpreview to create a version of the new image.

The following is included in the update

– Fixed various bugs reported by the community in the in-client designer.

– We can now reference Report and XMLPort objects from the base application. This gives us the ability to use these objects in the RunObject property, as well as, declare variables of the types Report and XMLPort, and call AL functions on them.

– Improved IntelliSense for Pages and Tables. IntelliSense will offer keywords in Pages and Tables. The supported keywords will be offered in the correct context and are intended to help build the object correctly.


– IntelliSense for attributes. The list of available attributes will be displayed after typing ‘[‘. Each attribute will also include signature help showing the number and types of expected parameters. Also, IntelliSense for the EventSubscriber attribute offers lookup for the event name and the field/action name parameters which helps discover the available event publishers.

– Fixed miscellaneous bugs reported to Microsoft. Issues submitted to the GitHub project issue list that have been fixed have been marked as included in the January update.

Microsoft would like to thank all those who registered comments or issues and at the same time, remind you that the best way to give feedback is through the https://github.com/microsoft/al/issues project.

Thursday, 29 December 2016

Adding new field to page (without adding to table) using new Visual Code

We will learn how to add new field to page which is not available in table using new visual studio code.

Sample requirement is to add a Boolean field in Job Card page to check whether there are any comments available without adding field to table.

1.     Open Visual Studio Code

2.     Create new project/folder if you want to develop as a new extension or open folder in which you want to add this feature. I am using same previous folder “ReasonCodeforLostJobQuote”.

3.     Create new file

4.     Enter Name “PagJobCardExtCheckComments.al”

5.     Enter “tpageExt” which adds sample page extension snippet.

6.     Change ID, Name and Extends as below

7.     Enter “tfieldpage” which adds sample Page field snippet under Layout section.

8.     Replace “Myfield” with “Comments”

9.     We need to add “SourceExpr” in place of “Source”

10.                        Save the file and create a Codeunit which checks whether Comments available or not.

11.                        Create New file

12.                        Enter “CodCheckComments.al” in file name

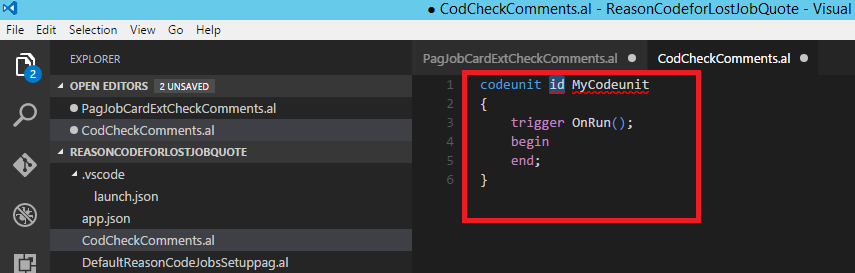
13.                        Enter “tcodeunit” which adds sample Codeunit snippet

14.                        Change ID, Name

15.                        Enter “tprocedure” which adds sample Procedure/Function Snippet.

16.                        Modify the function/Procedure as shown

17.                        Go back to above page PagJobCardExtCheckComments.al and Modify as below

18.                        Build the Package (Ctrl+Shift+B) and Publish (F5)

19.                        Open Job Card.

20.                        We can notice new field Comments in General tab But Check mark for Field is missing. Reported hear. UPDATE: Issue is fixed now
https://github.com/Microsoft/AL/issues/46


21.                        Open Comments action from Navigate and enter some text

22.                        Click OK in Comments Sheet.

23.                        Comments field is True which indicates some comments exist for this job.

This is how to add field to page without adding to table.
Stay tuned.

Tuesday, 27 December 2016

Developing Extensions Using the New Visual Studio Code – Part 6


After finishing step5, today I would like to create an action in Job card page using visual studio code.

Requirement is to:
1. Create a “Default Reason Code for Lost Quote” in Jobs Setup table/page

2. When we click Action “Lost Quote” in Job Card, the “Default Reason Code for Lost Quote” from Jobs Setup should be added to “Reason Code for Lost Quote” in Job card.

Let’s first add field in Jobs Setup table and page as we did in previous step2 and step4.

Final Table extension for Jobs Setup table looks like below
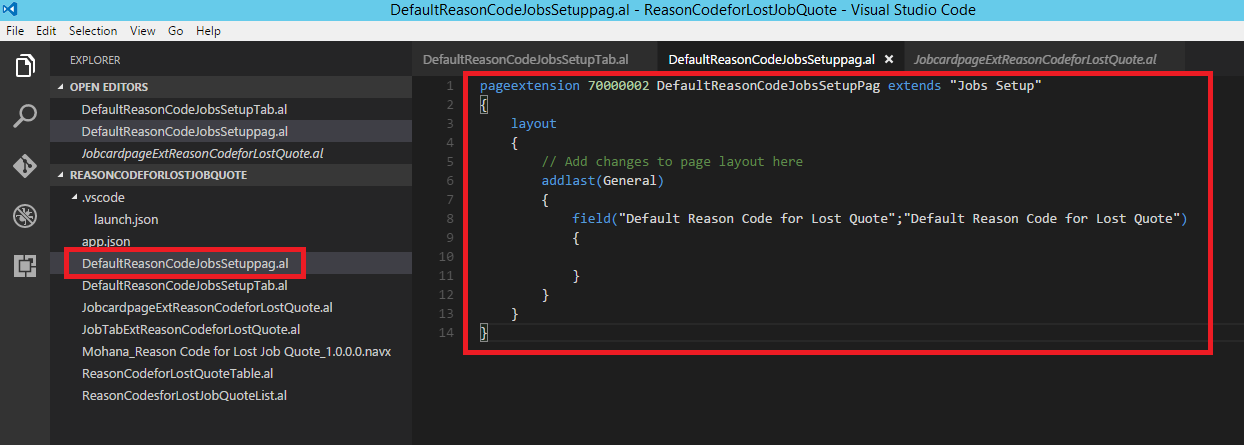
Final Page extension for Jobs setup page looks like below
Build the package (Ctrl+Shift+B) and Publish (F5).

Now we can go to Jobs Setup page and notice the “Default Reason Code for Lost Quote” field at the end of General Tab.
As TableRelations are not yet supported, enter any value in field “Default Reason Code for Lost Quote”

Ex: “Budget Issue”
Now create an action in Job Card which should add same value from Jobs Setup to Job card field “Reason Code for Lost Quote” when action is executed.

Let’s modify object 70000001 which is created in step4.

Final page extension looks like this
Build the package (Ctrl+Shift+B) and Publish (F5).

Go to Job Card. We can notice new Action “Job Lost Reason Code”.
Clicking on Action will add Default Reason Code from Jobs Setup to Job Card.

This is how to add an action to page using page extension in visual studio code.
Stay tunes.


UPDATE: Above mentioned bug is fixed. Table Relation and lookup's are working fine now.

Thursday, 22 December 2016

Developing Extensions Using the New Visual Studio Code – Part 5

We finished step 1, step2, step3 and step4 of creating a sample extension using new visual studio code.
Let’s start with step 5 – Building the package and Publishing the extension.

To Recap:

When we want to start creating our own project, we need to create a new project to contain it. Visual Studio Code manages projects by including all files from a directory. Whatever files exist in that directory are then part of our project. In addition there are two other configuration files; app.json and launch.json. We can define these ourselves, possibly by copying the files from sample code or we can have the system autogenerate them for us. Building the solution (Ctrl+Shift+B) will create the app.json file and publishing (F5) will generate the launch.json file.

Open the Visual studio code and Folder ReasonCodeforLostJobQuote which we created before if it is not open.

Building the solution (Ctrl+Shift+B)

Package is created (navx file)

We can create launch.json file manually or Publishing (F5) will also generate file automatically.

Let’s create manually which should be under vscode folder.

Click on New Folder

Name it as .vscode

Click on New file selecting .vscode folder.

Name it as launch.json

Create file which looks like below

Settings in the launch.json file:

Setting
Mandatory
Value
server
Yes, if connecting to an on-premises server
The HTTP URL of your server, for example: http://localhost
serverInstance
Yes, if connecting to an on-premises server
The instance name of your server, for example: NAV
port
No
The port on which the development endpoint is running on the server, default value: 7049
tenant
No
The tenant ID in case the server is configured for multitenancy.
windowsAuthentication
No
Specifies whether Windows or Azure authentication should be used for publishing the extension. Currently only Windows authentication is supported.
startupObjectId
No
The ID of the startup object to launch when you press F5. Currently only objects of type Page are supported.

Now Press F5 to publish the extension to servicetier “Navision_main”

It publishes and Install extension.

Go to RTC/Web Client.

Check extension management page.

Reason Code for Lost Job Quote extension is installed.


Go to Job Card to check the functionality.

Reason Code for Lost Quote field is added (I couldn’t see dropdown option. Need to investigate. UPDATE: MS has confirmed it is a limitation for now
https://github.com/Microsoft/AL/issues/39)


Stay tuned.


Developing Extensions Using the New Visual Studio Code – Part 4


We finished step 1, step2 and step3 of creating a sample extension using new visual studio code.

Let’s start with step 4 – adding a field to existing page like "Reason Code for Lost Quote" to Job Card page.

We need to create new page extension object using visual studio code.

The page extension object extends a Dynamics NAV page object and adds or overrides the functionality.

The structure of a page is hierarchical and breaks down in to three sections. The first block contains metadata for the overall page; the type of the page and the source table it is showing data from. The next section; the layout, describes the visual parts on the page. The final section details the actions that are published on the page.

In the layout section, you can use the following functions to place page fields and groups on the page. Similarly, in the actions section, you use these functions to place actions in the ribbon.

Function example
Applies to...
addfirst(General)
Groups only
addlast(General)
Groups only
addafter(AddressDetails; "Post Code")
Fields and groups
addbefore(AddressDetails; "Post Code")
Fields and groups
movefirst(General)
Groups only
movelast(General)
Groups only
moveafter(AddressDetails; "Post Code")
Fields and groups
movebefore(AddressDetails; "Post Code")
Fields and groups

If you want to modify existing fields and groups on a page, you use the modify() function.
Open the Visual studio code and Folder ReasonCodeforLostJobQuote which we created before if it is not open.


Click on New File
Add name “JobcardpageExtReasonCodeforLostQuote.al”

Typing the shortcut tpageext will create the basic layout for a table object when using the AL Extension in Visual Studio Code.
Like
Edit ID to 70000001 and Name as “Reason Code for Lost Quote” and extends “Job Card”.

Add field "Reason Code for Lost Quote" to General tab as shown below


This is how field is added to existing page using page extension in Visual studio code.

We will see how to Build final package and install extension in next blog.

Stay tuned.