Sunday, 21 November 2021

How to Restart D365 Business Central Environment


In NAV days, we have possibility to restart service tier and there are many reasons for the need of having restart option.

How to restart D365 Business Central environment?

Navigate to Dynamics 365 Business Central.


Click on the environment that you want to restart

Environment Details page will open


Click on Sessions

Manage sessions page will open


Click on Restart Environment.

Click yes on below confirmation message


If we go to details screen of environment then we can notice the status “Restarting”


After sometime status will be changed to “Active”


Active sessions will get below notification


I would expect a different notification than the regular notification to have clear message.


Monday, 15 November 2021

Application Insights instrumentation key to Application Insights connection string


Monitoring and Analyzing Telemetry is one of the powerful features of D365 Business Central.

We must enable Application Insights to Send Telemetry to Azure Application Insights.

Please go through below Microsoft Docs link for details

EnableSending Telemetry to Application Insights - Business Central | Microsoft Docs


I have noticed below Notification on my environment.

The environment uses an Application Insights instrumentation key. Change it to an Application Insights connection string. Go to Enable Sending Telemetry to Application Insights for more information.


Earlier We must have used only Application Insights instrumentation key to enable this feature to send telemetry in Dynamics 365 Business Central admin center but now we must use Application Insights connection string.


How and where to get this Application Insights connection string?


Sign in to the Azure portal

Search for Application Insights


Click on the Application Insights which we have used/created earlier.

“Connection String” will be available under the instrumentation key

Use “Copy to Clipboard” to copy full string.


Go back to Dynamics 365 Business Central admin portal and open the Environment which has this notification

Click on Modify link of Application Insights connection string

Make sure that Enable Application Insights is enabled.

Enter the Connection string that we copied from Azure portal.


Click on Save

Now the notification will be gone after refreshing the environment.


Sunday, 15 August 2021

Save report dataset to Excel from the request page (BC18.3+)


How to see dataset in Business Central reports


We used to have “About this Report” option to export the dataset of the report to inspect the data that is generated by a report dataset in earlier Dynamics NAV versions. This was very useful to filter the reports and optimize the dataset performance.


Microsoft included new feature that does similar to above functionality from D365 Business Central version 18.3 onwards. This new feature exports report dataset to Excel.


Step 1: Open the feature management page.


Step 2: By default, all the features are not enabled. Select the feature (Export report dataset to Microsoft Excel document)


Step 3: We need to enable the feature by changing the value of Enabled for from None – All users


Step 4: Refresh the environment for reflecting the new changes.


Step 5: Now, open Posted Sales Invoices page and then try to print the report for any posted document.


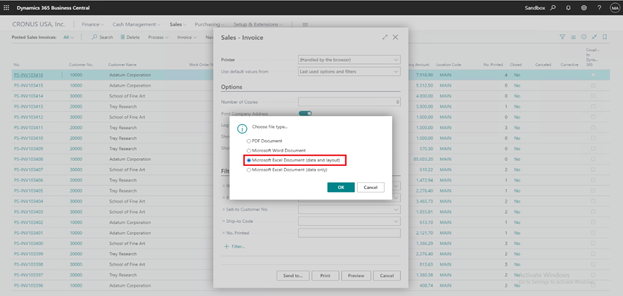
Step 6: In the request option page select “Send to…” option


Step 7: In the given “Choose file type…”, select “Microsoft Excel Document (data only) option and click “OK” to download the dataset to Excel document.


Step 8: Now, open the downloaded excel document to view the dataset.


Step 9: To view the developed layout with the data select another option “Microsoft Excel Document (data and layout)” and click OK.


Step 10: Open the downloaded excel file to see the report output with the developed RDL layout.


Tuesday, 3 August 2021

Start your free Dynamics 365 Business Central trial

Do you want to try, learn and explore Business Central?

Please follow below steps on how to set up a free Business Central trial environment.


1. Browse

     https://www.microsoft.com/en-in/microsoft-365/enterprise/office-365-e3


2. Click on Free Trial


3. Enter Email address and click Next


4. Click on Set up account


5. Enter details and click Next


6. Select either Text me or Call me and click on Send Verification code


7. Enter verification code that you have received and click Verify


8. Now we must select our domain


9. Enter the domain name and click “Check availability”.


10. Click Next


11. Enter a Username and password


12. Click Sign up


13. Click Get Started


14. Download Office apps if you want otherwise click Continue


15. Select “No, use default for now” option and click “Use this domain”


16. Add new users if you want otherwise click “Do it later”


17. Click continue


18. Click continue


19. Provide your feedback and submit and then click “Go to admin center”


20. Now we are in Microsoft 365 admin center.


21. In the same browser, open http://businesscentral.dynamics.com/ to sign up for Dynamics 365 Business Central


22. Click Sign In


23. Select or enter the account which we have created in above steps


24. Enter the password and click Sign In


25. You can select yes/no in below screen. 


26. Then it will start setting the Dynamics 365 Business Central environment in back end. Will take couple of minutes.


27. If you by any chance get below screen, then please keep waiting.


28. Click on Get started


29. Click Skip & go to Dynamics 365 Business Central


30. Click on Get Started.


31. Now we are in Dynamics 365 Business Central environment.


In next post, I will explain how to manage different environments from Dynamics 365 Business Central Admin center.


Wednesday, 4 November 2020

What Code Analyzers are right for you?

A code analyzer is a library that builds on the compiler's functionality to offer enhanced analysis of the syntax and semantics of your code at build time. The AL Language extension for Visual Studio Code contains four analyzers:

·        CodeCop is an analyzer that enforces the official AL Coding Guidelines. For more information about the CodeCop rules, see CodeCop Analyzer Rules.

·        PerTenantExtensionCop is an analyzer that enforces rules that must be respected by extensions meant to be installed for individual tenants. For more information about the PerTenantExtensionCop rules, see PerTenantExtensionCop Analyzer Rules.

·        AppSourceCop is an analyzer that enforces rules that must be respected by extensions meant to be published to Microsoft AppSource. For more information about the AppSourceCop rules, see AppSourceCop Analyzer Rules.

·        UICop is an analyzer that enforces rules that must be respected by extensions meant to customize the Web Client. For more information about the UserInterfaceCop rules, see UICop Analyzer Rules.


If you are developing an app for AppSource (ISV, Add-on Apps) then you need to enable below Code Analyzers

AppSourceCop 

CodeCop 

UICop 


If you are developing a customization for a specific customer then you need to enable below code analyzers

PerTenantExtensionCop 

CodeCop 

UICop 


Do not forget to set "al.enableCodeAnalysis"true


Friday, 16 October 2020

Change in sandboxName in Launch.json


I was delivering a D365 Business Central training to a client today and was explaining about Launch.json and mentioning that the launch.json file contains information about the server that the extension launches on.


And if we have multiple sandbox environments then we must specify which sandbox to be used in property called “sandboxName


Tried to add the parameter and not able to find it.


Shocked for a second and noticed 2 new properties in the Launch.json


environmentType: Specifies environment to use to connect to Business Central.

Ex: Sandbox: Specifies a sandbox environment

environmentName : Specifies which production, or sandbox environment to use.


Looks like Microsoft has replaced sandboxName with environmentName and provided option to select the environmentType.   


Did not use Production option yet.