Showing posts with label Page Designer. Show all posts

Thursday, 16 February 2017

NAV Development Tools Preview – February Update

Welcome to the February update for the Developer Preview. As in the last two updates, MS has fixed bugs reported by us on GitHub issues list (https://github.com/Microsoft/AL/issues) and made other improvements. 
We can see a list of what’s new below.
– Finishing your design work in the client now offers two options on saving, allowing you to save the changes to the tenant for all users, or to save the changes to a file that you can work on later in VS Code. Performance of the designer has improved and is snappier.


– To guide users towards a better page design, we’ve been adding a few rules in the in-client designer. For example, you can only drop media fields onto card part pages. Also, you cannot drop a field under a repeater control, because this is not the design that list pages were intended for.
– Getting started in VS Code has been streamlined. Once you’ve installed the visx file, just enter AL: Go! in the command palette (Ctrl+Shift+P) and you’ll be offered a new folder to build a solution in. The preset values are configured for your Azure Gallery instance and if you’re missing the symbols for the project, VS Code will offer to download them for you. Note, we’ve introduced a shortcut for this too – Alt+A, Alt+L. Enjoy!


– We’ve made improvements in IntelliSense with contextual support for keywords in all objects – and we’ve added autocompletion and IntelliSense for setting values for the CalcFormula and TableRelation properties.
– You can now reference Query objects from the base application. This gives you the ability to declare variables of the type Query and call AL functions on them.
– References by symbols have been implemented meaning that you can find all references in an inline editor. Pressing Shift+F12 on top of a symbol will open a view that lets you jump to all instances of that symbol. Furthermore, selecting a symbol and pressing F2 allows you to rename all instances of that symbol. Note, that symbolic rename is cleverer than text matching and will only change the current symbol. For example, it will replace all instances of variable Foo, but not rename function Foo.
– Two AL variables have been introduced mapping to the HTTP Client and JSON types. Using HttpClient, HttpResponseMessage, JsonObject, JsonToken, and JsonValue will allow you to access Azure functions and other Web services.
– Miscellaneous bugs reported from GitHub have been fixed.
Just like in the last update, we’ve already updated the Azure Gallery so new images will include the update. Again, we’ve designed for compatibility with your existing files so any .al projects you have already will work with the AL Language extension for VS Code. Having said that, changes may need to be introduced at some time so save your work independently as you go.
MS has big ambitions for the next month so stay with us. Thanks again for the bugs – keep them coming and MS will fix them as fast as they can.

Thursday, 22 December 2016

Microsoft Dynamics NAV Tenerife Page Designer - Part 2


We have seen how to add fields, arranging the field and renaming groups in previous blog here

We will see how to remove existing field from page using new Page Designer. 

Open Customer card.

Click on New feature page designer on top right and besides help.
Which opens page in design mode like below.
With an arrow mark at the end of each field.

Click on Arrow mark to get the Remove option.


Click on Remove.

Field is removed.
Go back to "Add field to page" option and notice that Field Name 2 status is ready.
We can notice the change in RTC as well.


Stay tuned.


Wednesday, 21 December 2016

Microsoft Dynamics NAV Tenerife Page Designer - Part 1


We will learn how to add existing field to page, rearrange fields and rename group names using new Page Designer. 

Add existing fields to page:
First, have a look at standard customer card (Ex: 10000) in both RTC and web client.


Click on New feature page designer on top right and besides help


Which opens page in design mode like below


Selecting the Design mode allows fields to be repositioned and groups renamed. Fields that are present on the source table can be added to the page and the page itself may be previewed using a desktop/phone/tablet view.

Click on More option which is besides Design mode


Now the page looks like


We can add new field, action part and page to customer card.
Click on Field.

Which opens Add field to page option on right hand side of page.


Which shows field name, datatype and status like whether it is already placed in page or ready to place.
Now I would like to add Name 2 field to my customer card.

Select the field to drag it on to page where ever we required.


We can notice a pointer which shows where the field is going to be added.
Now the field is added to page and same is updated in Add field to page list as placed which was ready before.


We can also see the preview of Desktop, Table and Phone directly from here.
Notice the option on design mode bar.


It is Desktop view by default and we can click on Tablet and Phone views to check how our changes will look.
Tablet view looks like below after adding Name 2 field.


We can change orientation to Portrait by clicking on option besides STAR above.

Click on Phone View.

We can change orientation to landscape view also.
Go back to RTC and we can notice that field Name 2 is added to page Customer Card.


Rearrange Fields:
Now I would like to move IC Partner field at the end of General Group.
We can simply select the field and drag to position where we would like move.


Now the field is moved/rearranged in both web client and RTC.


We can see these changed in Tablet and Phone also as explained above.


Rename the Group:
We can rename the Group name after opening the page in design mode.
I would like to change General Group to Common.
Select the Group name and simple change as per your requirement.


We can notice that change in both Web Client and RTC customer card.


What it actually does in back ground is:

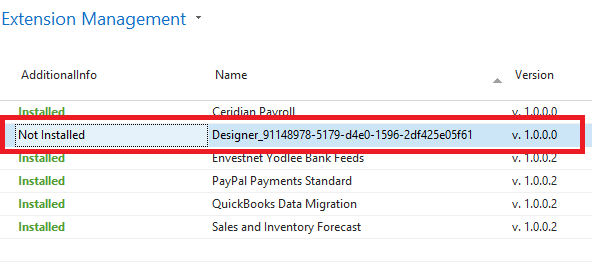
It generates code and creates an extension which we can see in Extension management page.


If we uninstall the extension then all our changes will be rolled back.

We can check standard Customer card in RTC and web client.