Thursday, 22 December 2016

Microsoft Dynamics NAV Tenerife Page Designer - Part 2


We have seen how to add fields, arranging the field and renaming groups in previous blog here

We will see how to remove existing field from page using new Page Designer. 

Open Customer card.

Click on New feature page designer on top right and besides help.
Which opens page in design mode like below.
With an arrow mark at the end of each field.

Click on Arrow mark to get the Remove option.


Click on Remove.

Field is removed.
Go back to "Add field to page" option and notice that Field Name 2 status is ready.
We can notice the change in RTC as well.


Stay tuned.


Wednesday, 21 December 2016

Developing Extensions Using the New Visual Studio Code – Part 1


I would like to start developing a simple extension using new visual studio code and lets start together.

I would like to have functionality which allows to add a Reason for Lost Quote on Job Card.

Let’s start with step 1 to achieve above functionality by creating an extension using Visual studio code.

We need to explore about the Visual Studio Code and AL language Extension.

All functionality in Dynamics NAV are coded in objects. Table objects define the table schema that holds data, page objects represent the pages seen in the user interface and codeunits contain code for logical calculations and for the application behavior. These objects are stored as code, known as AL code, and are saved in files with the .al file extension.

Note: A single .al file may contain multiple objects.

There are two other special objects which are specifically used for building extensions. Table extension objects and page extension objects are used for defining additive or overriding changes to table or page objects.

·        The table extension object allows us to add additional fields or to change some properties on a table provided by the Dynamics NAV service. In this way, we can add data to the same table and treat it as a single table.

Along with defining other fields, the table extension is where we write trigger code for our additional fields.

·        The page extension object extends a Dynamics NAV page object and adds or overrides the functionality.

The structure of a page is hierarchical and breaks down in to three sections. The first block contains metadata for the overall page; the type of the page and the source table it is showing data from. The next section; the layout, describes the visual parts on the page. The final section details the actions that are published on the page.

If we want to modify existing fields and groups on a page, we use the modify() function
When we want to start creating our own project, we need to create a new project to contain it. Visual Studio Code manages projects by including all files from a directory. Whatever files exist in that directory are then part of our project. In addition there are two other configuration files; app.json and launch.json. We can define these ourselves, possibly by copying the files from sample code or we can have the system autogenerate them for us. Building the solution (Ctrl+Shift+B) will create the app.json file and publishing (F5) will generate the launch.json file.


So let’s create a folder for our Project.


Open Visual Studio Code
Click on Explorer


Click on Open Folder
Select the folder which we created above.


We need create a table (Reason Code for Lost Quote) to Specify reason codes. Reason codes are used to indicate why Job Quote was Lost.

Click on New File as shown in picture to Create .al file


Name the file as ReasonCodeforLostQuoteTable.al


If you go back and check above folder then we can see the created .al file


Now create 2 fields in table

Typing the shortcut ttable will create the basic layout for a table object when using the AL Extension in Visual Studio Code.


Now it looks like


Edit table id

If you try to add any 50000 series then it shows error as shown below


Let’s create table with id 70000000 and Name "Reason Code for Lost Quote"

Edit the Myfield to “Code”


And Datatype of field from Integer to Code[20].

Add field 2 as Description with Text 50.

Now the object looks like this.


This is how to create new table using new Visual Studio Code.

We will see how to add new field in existing Job table in next blog.

Stay tuned.

Microsoft Dynamics NAV Tenerife Page Designer - Part 1


We will learn how to add existing field to page, rearrange fields and rename group names using new Page Designer. 

Add existing fields to page:
First, have a look at standard customer card (Ex: 10000) in both RTC and web client.


Click on New feature page designer on top right and besides help


Which opens page in design mode like below


Selecting the Design mode allows fields to be repositioned and groups renamed. Fields that are present on the source table can be added to the page and the page itself may be previewed using a desktop/phone/tablet view.

Click on More option which is besides Design mode


Now the page looks like


We can add new field, action part and page to customer card.
Click on Field.

Which opens Add field to page option on right hand side of page.


Which shows field name, datatype and status like whether it is already placed in page or ready to place.
Now I would like to add Name 2 field to my customer card.

Select the field to drag it on to page where ever we required.


We can notice a pointer which shows where the field is going to be added.
Now the field is added to page and same is updated in Add field to page list as placed which was ready before.


We can also see the preview of Desktop, Table and Phone directly from here.
Notice the option on design mode bar.


It is Desktop view by default and we can click on Tablet and Phone views to check how our changes will look.
Tablet view looks like below after adding Name 2 field.


We can change orientation to Portrait by clicking on option besides STAR above.

Click on Phone View.

We can change orientation to landscape view also.
Go back to RTC and we can notice that field Name 2 is added to page Customer Card.


Rearrange Fields:
Now I would like to move IC Partner field at the end of General Group.
We can simply select the field and drag to position where we would like move.


Now the field is moved/rearranged in both web client and RTC.


We can see these changed in Tablet and Phone also as explained above.


Rename the Group:
We can rename the Group name after opening the page in design mode.
I would like to change General Group to Common.
Select the Group name and simple change as per your requirement.


We can notice that change in both Web Client and RTC customer card.


What it actually does in back ground is:

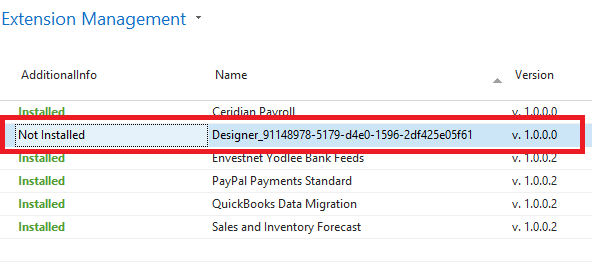
It generates code and creates an extension which we can see in Extension management page.


If we uninstall the extension then all our changes will be rolled back.

We can check standard Customer card in RTC and web client.

Tuesday, 20 December 2016

How do I get started to Preview of Dynamics NAV Development Tools

Today Microsoft has announced new tools we will use to build extensions and
apps in and for Dynamics NAV.

It seems Microsoft Code name for it is Tenerife. 

How do I get started?
First we need an Azure Subscription.
If we don’t have one, we can get a free 30-day trial from https://azure.microsoft.com/free/ that will give you access to everything you need.

Secondly, head over to http://aka.ms/navdeveloperpreview.


Login to your Azure Subscription.

Select your subscription, resource group, location, name, and a VM Admin Password. Leave the remaining fields as their defaults. Accept the terms, Pin to dashboard and select Purchase. The instance takes about 5 minutes to set up, and the VM will be ready about 15 minutes after Azure says Deployment Succeeded.

We can see new resource in Dashboard after successfully deployed.
Click on Server1.
 

Click Connect.
 

Enter Password entered above.
 

Now you are in VM with below Desktop Icons.

Click on “Navision_main Web Client”.
Web client contains a new feature allowing design of pages. Selecting the Design mode allows fields to be repositioned and groups renamed. Fields that are present on the source table can be added to the page and the page itself may be previewed using a desktop/phone/tablet view.


Open Visual Studio Code on desktop.
Select Folder “C:\DEMO\New Developer Experience\Samples”
It looks like below.

Stay tunes for more details.